Module 1.1: OLCC Primer#
Welcome to the DataChemistry OLCC (OnLine Chemistry Course).
This notebook is under development
OLCC History#
OLCC’s (OnLine Chemistry Courses) are organized by the ACS (American Chemical Society) Division of Chemical Education’s Committee on Computers in Chemical Education (CCCE) with the first OLCC being offered in the Spring of 1996. This makes them one of the oldest Online Courses and the first one is available through the Internet Archive’s WayBack Machine.
The acronym OLCC is actually misnomer dating from the dawn of the internet and today we would call them intercollegiate collaboratively taught hybrid courses, where students of multiple classes meet with a resident faculty member while also communicating online with experts from both academic and nonacademic institutions. Further information on OLCCs can be found in this 2020 Journal of Chemical Education Article.
This data chemistry OLCC will involve multi-campus discussions on the CCCE DataChemistry2025OLCC GitHub repository where you can also download the Python based Jupyter notebooks. You will be provided resources on how to run the notebooks on your own computer or access an online Jupyter Lab through the nanoHub.
The purpose of this notebook is to provide you with instructions on how to use the tools and technologies we will use in this course.
1. GitHub#
This course is using a series of Jupyter Notebooks posted in the Course GitHub DivCHED-CCCE/DataChemistry2025OLCC. You can download these notebooks to your own computer and run them locally, or access them through the course nanoHub tool. If you do not have an account at github.com, please make one now.
1. Create an Account on GitHub#
If you do not have an account at github.com, please make one now. You may or may not want to use your university email. If you instructor is using GitHub Education and having you get a student account you will need to use your school email. But you will need to change the account email address after the class or you may not have access to it after you graduate. That is your gitHub account will provide a service you can use long after the class to generate your own repository and access other people’s repositories.
2. Watch Class Discussions#
Once you have created an account navigate to the course GitHub DivCHED-CCCE/DataChemistry2025OLCC. You now want to watch the discussions, which will allow you to participate in discussions with faculty and students from multiple campuses. This is a three step process as outline in the following image
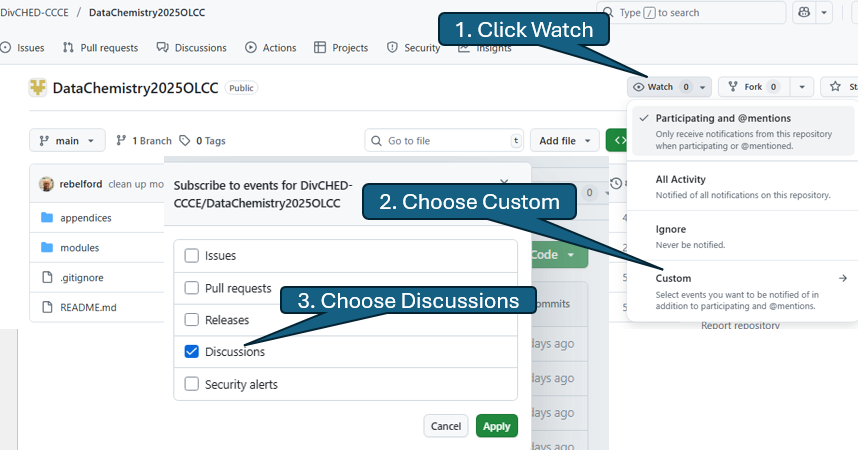
Once you are watching discussions you will get an email when someone makes a comment, and a reply to your email will result in a comment to the discussion forum.
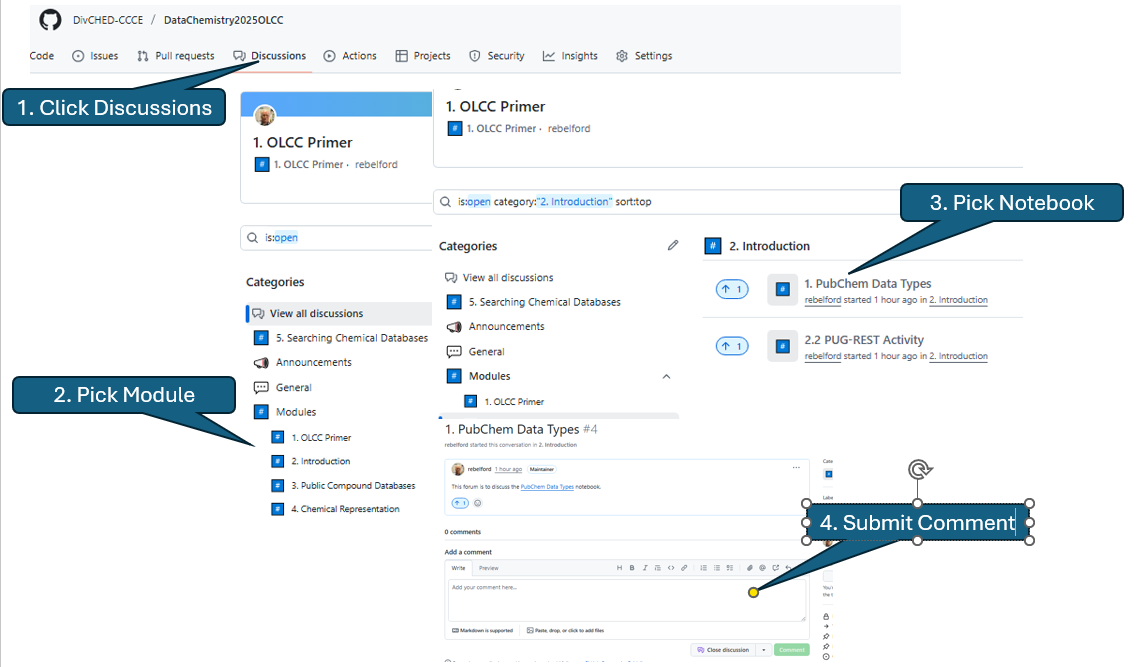
3. Participate in Discussions#
The discussion forum of the course GitHub has the same Directory structure as the repository and to discuss a notebook you navigate through the Discussion Topics to the desired notebook discussion. You first click Discussions on the top toolbar and then choose the forum topic the notebook you wish to discuss is in.
4. GitHub Education#
Your instructor may have set up a GitHub Education account that provides you with a student pack with access to additional resources. These resources include access to GitHub Copilot Pro, which is an AI powered code assistant that can help you write code. This is a two step process. First you must sign up to GitHub education which requires you to prove you are a student, and then you can apply for the student pack, which unlocks these resources.
4.1 Sign up for GitHub Education#
Go to GitHub Education Students
click Join GitHub Education. You will be asked to sign in with your GitHub account. If you do not have an account, you can create one at this point.
click Start an Application
choose student and type in the name of your school, you will need to use your University email address.
If you have already created an account with a different email address you can change the email address in your account settings. You can find more information on the GitHub Education page.
2. nanoHUB#
There are essentially two ways you can run the code on your computer, install software on your computer and download the code, or use a cloud service. When you install software on your computer you have direct control over the Python packages your environment uses and you are most welcome to download the code from the gitHub onto your computer and run the assignments on your local host. The nanoHUB is a cloud service that runs a Jupyter Hub where we have not only uploaded all the notebooks you will use in the class, but have also installed all the packages you need to run the notebooks.
2.1 Create account at nanoHUB#
Go to https://nanohub.org/ and sign up if you do not already have an account. If you have a Google account I suggest you use the Sign in with Google option, or you can create an account from scratch. There is no problem using you school email, as unlike GitHub, nanoHUB is not a place for students to upload and share code, but a place to run the code. There are only three fields that you are required to fill out and this is a free service being provided through the nanoHUB project that is run out of Purdue University.
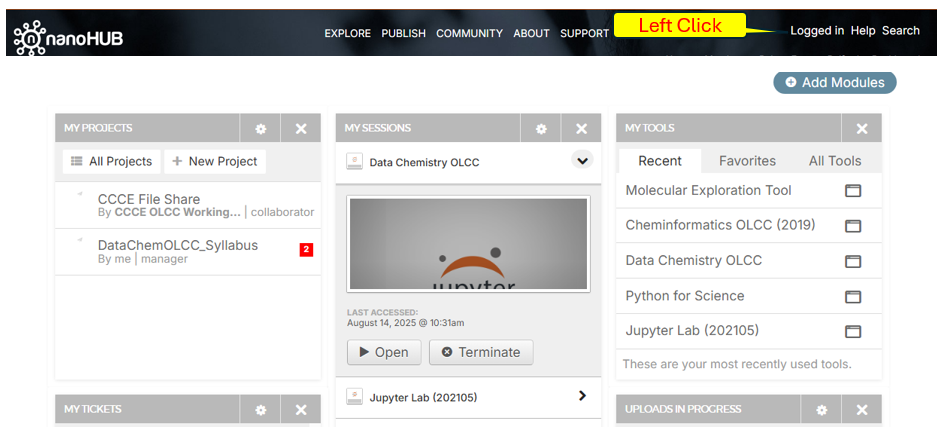
2.2 Navigating nanoHUB#
Once you have an account left click Logged in (your profile will show) and this will activate your dashboard. You will see several Modules as in the image below that allow you to access your sessions and various tools.
2.2.1 MY TOOLS#
If you look at MY TOOLS and click on All Tools you can search for tools within the nanoHUB. If you click the heart next to any tool it gets placed in your Favorites section and is easy to access.
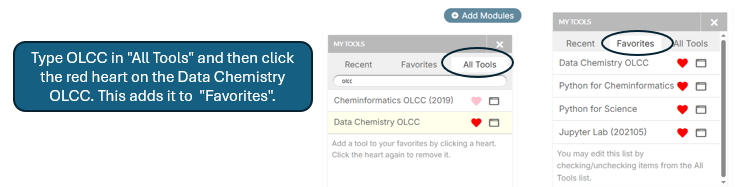 You are advised to place two tools in your Favorites.
Jupyter Lab (202105)
Data Chemistry OLCC Once you click a tool it will show up in My Sessions.
2.2.2 My SESSIONS#
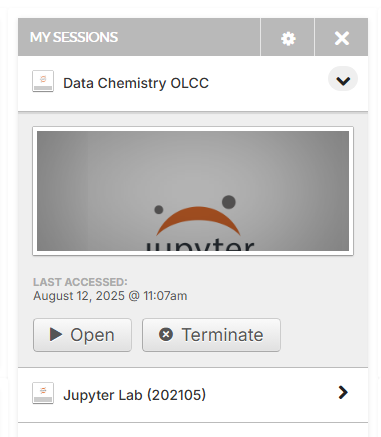
You can run up to three sessions at a time and you can see which ones you are running in the MY SESSIONS module. In the following image a Jupyter Lab and the Data Chem OLCC are both running. If you need to run the Data Chemistry OLCC and it is already in your MY SESSIONS you should not relaunch the APP but Open the running session. If you need to close it simply choose the terminate option.
Data Chemistry OLCC#
When you launch Data Chemistry OLCC it opens the course landing page within the Jupyter Lab and the File Browser is open in the left pane. You have actually opened the latest version of the course website and so the File Browser of the Jupyter Labs left frame starts in that location. If you want to run Jupyter Notebooks in other branches of your root directory you can launch the Jupyter Lab (202105) tool that opens in your root directory (next option).
Jupyter Lab (202105)#
When you run this module you open a Jupyter Lab in your nanoHUB user-home directory and can see your entire user file directory structure from the Jupyter Lab File Browser. This is very powerful as you are in your own user directory within the nanoHUB where you can read, write and execute files. In the following screenshot we have navigated to the datachem2025olcc directory and see there are three folders r11, r13 and r15. These are three different revisions of the course tool that existed when the screenshot was made. When you launch the tool from MY TOOLS it will launch the most recent version of the tool, and if an update occured, it will create a new revision and launch that. Sinc but you still have access to the old material by going to the revision number you performed your work in.
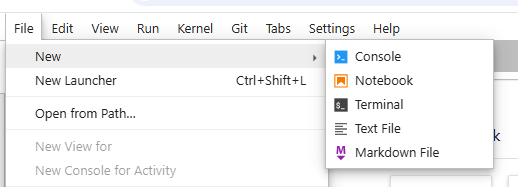
There are many online tutorials and YouTubes on how to use Jupyter Lab and you need to play around and have some fun. If you click File/New/Terminal you will open a command line terminal within your jupyter hub where you can do things like clone gitHub repositories and the like.
3. Python Code#
Python code can live in different file types depending on the purpose of the code and we will be using two different file types, python files (*.py) and interactive Python notebook files (*.ipynb).
.pyfilesPlain text files that store Python code.
Best for scripts, packages, and projects meant to be reused or run outside of Jupyter.
Executed linearly from top to bottom.
.ipynbfiles (Jupyter Notebooks)JSON documents that mix code cells and Markdown cells.
Excellent for exploration, teaching, data analysis, and reproducible science.
Store outputs (plots, tables, text) alongside the code.
To execute the code you need to have python installed on a computer and you sort of have two choices. 1. Run your code in a cloud service 2. Install the software on your own computer.
When you install the software on your own computer you will need to control the environment it is in and provide access to the necessary packages. You also have two choices for running the code, in a full fledged IDE (Interactive Development Environment) or within a Jupyter Notebook or Lab, which many scientists treat as an IDE.
4. Jupyter Platform#
4.1 Jupyter Hub#
The nanoHUB is providing a Jupyter Hub that has all the packages preinstalled to run the code. When you launch your class tool or open it in the “My Sessions” you are opening a Jupyter Lab within that directory of your nanoHUB user space. This is the simplest and easiest way to run the course assignments.
4.2 Jupyter Lab#
A Jupyter Lab is an interface that allows you to concurrently run different notebooks, and those notebooks can actually be in different environments with different packages. If you are running your notebooks on your computer you need to start the lab in the Linux terminal with the following command. Note in this class we are using conda to manage the environments, and you need to activate an environment containing the jupyter lab package, which we will call “jpenv”. If you are using the nanoHUB this is preloaded when you start the tool.
conda activate jpenv
jupyter lab
4.3 Jupyter Notebook#
The Jupyter notebook has code and Markdown cells, and the code cells allow you to execute the script within the code cell. There are empty square brackets ([ ])to the left of each code cell and if they have a star it means the cell is executing and if they have a number it tells you the order the cell was executed in. So you can run different code cells in any sequence you want. Please reference this Jupyter Book Chapter on “Running and Creating Jupyter Notebooks”
4.4 Jupyter Book#
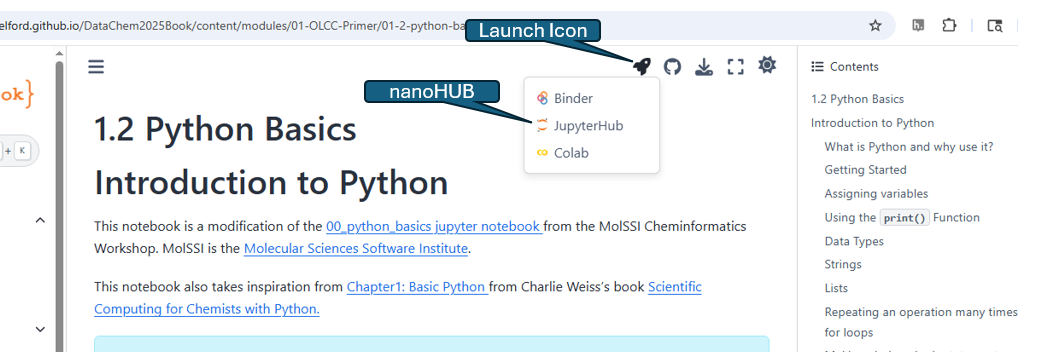
A jupyter book is compiled by combining multiple notebooks into a html based webpage. The Fall 2025 Data Chemistry OLCC is a Jupyter book that allows you to quickly navigate the course content without having to run any code. If you wish to run the code you can click the launch icon (rocket ship) and you are given three choices. The link labeled JupyterHub will connect you to the nanoHub and open a tool that has all the packages installed.
4.5 Notebook Intelligence(NBI)#
5. Local Python Installation.#
If you want complete control over your environment and a choice of the IDE (Interactive Development Environment) you will need to install the required software on your own computer. You will need to set up a virtual environment and it is suggested that you use the Conda Package management system (in contrast to native Python venv environments). If you use windows it is suggested you use Windows Subsystem Linux (WSL) and instructions can be found in the Py4Sci Jupyter book module 1 Setting up your computer.
In this lesson you will find:
Instructions for Installing WSL
Ubuntu and Bash Commands
Installing miniconda
Common Conda command
Creating Conda Environments
Installing Packages
Connecting Jupyter Lab to different Environments
Your instructor may require you to use VSCode or a different IDE and will provide instructions for that in person.
6. VSCode (optional)#
So far, we’ve been using Jupyter notebooks to write and run Python code. Jupyter is excellent for interactive exploration and data analysis, but not all coding projects are designed to run in a notebook environment. For larger projects, debugging, or AI-assisted workflows, it’s often helpful to use a full-featured text editor. In this course, we’ll use Visual Studio Code (VS Code), a free editor from Microsoft that:
Supports many programming languages (including Python).
Integrates with Jupyter notebooks.
Provides a client–server workflow with WSL (Windows Subsystem for Linux).
Connects to GitHub Copilot, an AI-powered coding assistant that suggests, generates, and completes code.
Step 1: Install VS Code (Windows-side)#
Go to the VS Code download page and install the 64-bit Windows version.
Do not install VS Code inside your WSL Linux system. It must be installed on Windows.
During installation, when prompted to select Additional Tasks, check the box for Add to PATH.
This ensures you can launch VS Code from WSL with the command
code ..
Install the Remote Development extension pack inside VS Code.
This includes:
Remote – WSL (what we need)
Remote – SSH
Dev Containers
Only Remote – WSL is strictly required, but the pack makes it easier to manage other workflows later.
Step 2: Update WSL (Ubuntu side)#
Some WSL distributions may be missing libraries needed by the VS Code server. To prepare your Linux system:
sudo apt-get update
sudo apt-get install -y wget ca-certificates
wget: lets Linux download files from the web.ca-certificates: enables secure HTTPS connections.
Step 3: Running VS Code in WSL#
Open your Ubuntu terminal.
Navigate to the project folder you want to work in (your working directory).
Run:
code .The
.means “open the current directory in VS Code.”If you forget the dot, VS Code will open, but not in the correct project folder.
When you launch this way, VS Code runs in a client–server mode:
Client (UI) → menus and editor windows run on Windows.
Server → Python, Git, and extensions run inside your WSL distribution.
Look at the bottom-left corner of VS Code: it should say WSL: Ubuntu to confirm you’re connected correctly.
Step 4: Extensions in WSL#
When you click the Extensions tab in VS Code, you’ll see three sections:
Local: extensions installed on Windows.
WSL: Ubuntu - Installed: extensions installed inside your Linux distribution.
Recommended:
For this course, make sure the following extensions are installed inside WSL:
Python
Jupyter
Remote – WSL
GitHub Copilot
GitHub Copilot Chat
If an extension is missing you can search for it in the market place
Step 5: Connect GitHub Copilot#
To enable GitHub Copilot:
Install the GitHub Copilot and GitHub Copilot Chat extensions if they are not already installed(see Step 4).
Sign into GitHub inside VS Code when prompted.
Authorize VS Code to access your Copilot subscription.
Test Copilot:
Open a Python file.
Type a comment like:
Create a function to calculate the molecular mass of water
Copilot should suggest code below the comment.
Full setup instructions: Copilot Setup Guide